=Start=
缘由:
学习一下各种常用Linux系统故障排除工具的使用。
正文:
参考解答:
This Sysdig cheatsheet is a great guide of command-lines linux admins can use to get insights into their servers. Whether you’ve been an admin for one month or 20 years you’ve definitely used one if not all of these tools to troubleshoot an issue. Because we love Sysdig (naturally!) we also included a translation for each of these common operations into the sysdig command line or csysdig.
Rather than attempt covering all options from manpages (which would have made for boring coverage of many esoteric, rarely-used switches), we’ve started from examples referenced at the most popular web pages you’d find when you search for terms like “strace examples”, “htop examples”, and so forth.
Do you have favorites that aren’t listed here? Let us know and we’ll include them in future articles.
strace
There’s one subtle difference between strace and sysdig that will be apparent in many of these side-by-side comparisons: Many of the simplest strace examples include command-lines that are executed and traced as a “one-shot” operation. On the other hand, Sysdig has a somewhat different philosophy, in that it either watches live events from afar as they happen, or analyzes capture data previously saved to a file. Thankfully, Sysdig’s rich filtering options provide the knobs to watch for specific one-shot executions, as you’ll soon see.
|
Operation
|
strace
|
sysdig
|
Note
|
|---|---|---|---|
| Trace the execution of a command | strace who |
sysdig proc.name=who |
Whereas strace runs the who command shown here as a one-shot, Sysdig is watching for the execution of who. Use Sysdig’s filtering to further isolate a specific run, e.g.:
This watches for a who that’s about to be run in a shell that you’ve determined to have PID of 534. |
| Trace only when certain/specific system calls are made | strace -e open who
|
sysdig evt.type=open and proc.name=who
|
|
| Save a trace to a file | strace -o output.txt who |
sysdig -w output.scap proc.name=who |
With strace, the file produced contains the same text you’d have viewed on the screen if run interactively. With Sysdig, you get a raw, re-usable capture file, such that you can view the text output with:
You could also use this as the basis to apply filters or any other Sysdig functionality you want to apply as you revisit the original events. |
| Watch a running process with PID=1363 | strace -p 1363 |
sysdig proc.pid=1363 |
|
| Print a timestamp for each output line of the trace | strace -t who |
sysdig proc.name=who |
Sysdig prints timestamps by default. |
| Print relative time for system calls | strace -r who |
sysdig -tD proc.name=who |
Sysdig offers several more ways to represent timestamps via the -t option. |
| Generate batch statistics reports of system calls | strace -c who |
sysdig -w output.scap proc.name=whoFor one-shot batch text reports:sysdig -r output.scap -c topscalls -c topscalls_time
Or for an interactive report that allows for further drill-down: |
Sysdig’s default behavior is more optimized for the case of presenting event data as it happens rather than “batch” reporting. This is why the Sysdig equivalent is done in two steps here. |
| Generate live, per-second statistics reports of system calls for running process with PID=1363 | N/A | csysdig -v syscalls proc.pid=1363 |
While strace can show individual events as they happen live, or provide a single batch report for the execution of a command, csysdig’s views provide a unique ability to show live, periodic reports |
htop
Since htop is a live, interactive, curses-style tool, we’ll compare it to the live, interactive, curses-style csysdig.
For starters, both tools use the same approach of navigating the live table via Up/Down/Left/Right arrows and also PgUp/PgDn. For operations that affect a single process (killing, renicing, etc.) it is assumed you’ve used these controls to first highlight a particular process.
|
Operation
|
htop
|
csysdig
|
Note
|
|---|---|---|---|
| Change sort order based on a column of the table | Press F6, <, or > and then select a column by name, orPress M, P, or Tto sort by Memory, Processor Usage, or TimePress I to invert the sort order |
Press F9 or > and then select a column by name, or
Press Mouse-click on a column header |
|
| Kill a process | PressF9 or k |
Pressk |
|
| Renice a process | Press F7 or ] to reduce the nice value by 1Press F8 or [ to increase the nice value by 1 |
Press ] to reduce the nice value by 1Press [ to increase the nice value by 1 |
This illustrates how easy it is to customize Sysdig. I noticed when first writing this article that csysdig was missing a couple minor features like this, so I used the opportunity to learn how easy it is to write/modify Chisels, then put up my improvements as a Pull Request. You can do the same! |
| Display only processes started by a user named “phil” | Press u, thenSelect the user name phil from the list |
Launch as:csysdig user.name=philOr mouse-click Filter: from within csysdig at the top of the default Processes view, then append and user.name=phil to the current filter text |
|
| Change the output refresh interval to once every 5 seconds | Launch as:htop -d 50 |
Launch as:csysdig -d 5000 |
As you can see, htop works in units of tenths-of-a-second, while csysdig works in milliseconds. |
| Start a system call trace on a process | Press s to start an strace |
Press F6 to start a sysdig |
|
| List open files for a process | Press l to run a one-time lsof |
Press f to run a one-time lsof Or to see real-time, updating reports of files/directories used by a process, drill down to a specific process by pressing Enter, then press F2 and select a View such as Files, File Opens List, or Directories. |
See the Note above for “Renice a process” about how the one-time lsof was recently added as an enhancement. |
| Follow a process, such that it remains highlighted even as its order in the list changes | Press F |
Default behavior is to always follow the highlighted process |
lsof
|
Operation
|
lsof
|
csysdig
|
Note
|
|---|---|---|---|
| List all open files belonging to all active processes | lsof |
sysdig -c lsof |
|
| List processes that have opened the specific file /var/log/syslog | lsof /var/log/syslog |
sysdig -c lsof "fd.name=/var/log/syslog" |
|
| List processes that have opened files under the directory /var/log | lsof +d /var/log |
sysdig -c lsof "fd.directory=/var/log" |
|
| List files opened by processes named “sshd” | lsof -c sshd |
sysdig -c lsof "proc.name=sshd" |
|
| List files opened by a specific user named “phil” | lsof -u phil |
sysdig -c lsof "user.name=phil" |
|
| List files opened by everyone except for the user named “phil” | lsof -u ^phil |
sysdig -c lsof "user.name!=phil" |
|
| List all open files for a specific process with PID=1081 | lsof -p 1081 |
sysdig -c lsof "proc.pid=1081" |
|
| List all files opened by user “phil” or a process named “sshd” (OR logic) | lsof -u phil -c sshd |
sysdig -c lsof "'user.name=phil or proc.name=sshd'" |
Note the use of two layers of quotes with the Sysdig filter. |
| List all files opened by an “sshd” process for user “phil” (AND logic) | lsof -u phil -c sshd -a |
sysdig -c lsof "'user.name=phil and proc.name=sshd'" |
Note the use of two layers of quotes with the Sysdig filter. |
| Observe repeating reports of open files based on live activity | Enable repeat mode with one of:lsof -rlsof +r |
Similar live data can be obtained with a live/interactive csysdig view, launched like so:csysdig -v filescsysdig -v file_opens |
|
| List all network connections | lsof -i |
sysdig -c lsof "fd.type=ipv4" |
|
| List network connections in use by a specific process with PID=1014 | lsof -i -a -p 1014 |
sysdig -c lsof "'fd.type=ipv4 and proc.pid=1014'" |
Note the use of two layers of quotes with the Sysdig filter. |
| List processes that are listening on port 22 | lsof -i :22 |
sysdig -c lsof "'fd.port=22 and fd.is_server=true'" |
Note the use of two layers of quotes with the Sysdig filter. |
| List all TCP or UDP connections | lsof -i tcp
|
sysdig -c lsof "fd.l4proto=tcp"
|
tcpdump
tcpdump is focused entirely on network traffic, while network traffic is only a subset of what Sysdig covers. Many tcpdump use cases involve filtering, and tcpdump uses network-specific BPF filters, whereas Sysdig uses its own broader Sysdig filtering. The two approaches look similar in many ways, but you’ll want to look at the docs for each side-by-side as you progress to more advanced filtering needs. Also, since in Linuxeverything is a file, you’ll notice the Sysdig filtering examples below all leverage a “network-connections-via-file-descriptors” approach.
|
Operation
|
tcpdump
|
csysdig
|
Note
|
|---|---|---|---|
| Capture packets from a particular interface eth0 (192.168.10.119) | tcpdump -i eth0 |
sysdig fd.ip=192.168.10.119 |
Sysdig does not currently have filtering based on named interfaces, but the equivalent via IP address is shown here. |
| Capture only 100 packets | tcpdump -c 100 |
sysdig -n 100 fd.type=ipv4 |
|
| Display captured packets in ASCII | tcpdump -A |
sysdig -A fd.type=ipv4 |
|
| Display captured packets in HEX and ASCII | tcpdump -XX |
sysdig -X fd.type=ipv4 |
|
| Capture packet data, writing it into into a file | tcpdump -w saved.pcap |
sysdig -w saved.scap fd.type=ipv4 |
The Sysdig file format is capable of holding event data for much more than just network packets (e.g. system calls). |
| Read back saved packet data from a file | tcpdump -r saved.pcap |
sysdig -r saved.scap |
|
| Capture only packets longer/smaller than 1024 bytes | tcpdump greater 1024
|
sysdig "fd.type=ipv4 and evt.buflen > 1024"
|
The greater/less options in tcpdump reference overall packet length whereas evt.buflen in Sysdig is relative to payload size. |
| Capture only UDP or TCP packets | tcpdump udp
|
sysdig fd.l4proto=udp
|
Note that we don’t need to explicitly include fd.type=ipv4since we’re using other network-only filters here. |
| Capture only packets going to/from a particular port | tcpdump port 22 |
sysdig fd.port=22 |
Note that we don’t need to explicitly include fd.type=ipv4since we’re using other network-only filters here. |
| Capture packets for a particular destination IP and port | tcpdump dst 54.165.81.189 and port 6666 |
sysdig fd.rip=54.165.81.189 and fd.port=6666 |
Note that we don’t need to explicitly include fd.type=ipv4since we’re using other network-only filters here. |
iftop
Since iftop is a live, interactive, curses-style tool, we’ll compare it to the live, interactive, curses-style csysdig. Also, like tcpdump, iftop uses BPF filters. See the previous intro to the section on tcpdump for more detail about filtering differences.
|
Operation
|
iftop
|
csysdig
|
Note
|
|---|---|---|---|
| Display a table of current bandwidth usage between pairs of hosts | iftop |
Launch as:csysdig -v connectionsOr press F2 from within csysdig to change the View, then up-arrow to select Connections |
By default iftop watches just the first interface it finds, whereas by default csysdig watches traffic across the entire host. |
| Turn on display of network ports | Launch as:iftop -POr press p from within iftop |
Default behavior is to always display ports | |
| Observe traffic for just the eth0 interface (192.168.10.119) | Launch as:iftop -i eth0 |
Launch as:csysdig -v connections fd.ip=192.168.10.119Or mouse-click on Filter: from within csysdig, then append and fd.ip=192.168.10.119 to the existing filter text |
sysdig/csysdig do not currently have filtering based on named interfaces, but the equivalent via IP address is shown here. |
| Resolve DNS names | Press n from within iftop to toggle resolution for all hosts shown |
Press n from within csysdig to run nslookup on the currently-highlighted remote host |
|
| Change sort order based on a column of the table | Press < to sort by source Press > to sort by destination | Press F9 or > and then select a column by name, or
Press Mouse-click on a column header |
|
| Filter to show only traffic going to/from IP address 54.84.222.1 | Launch as:iftop -f "host 54.84.222.1" |
Launch as:csysdig -v connections fd.ip=54.84.222.1Or mouse-click on Filter: from within csysdig, then append and fd.ip=54.84.22.1 to the existing filter text |
|
| Pause the display | Press P |
Press p |
|
| Scroll the display | Press j to scroll upPress k to scroll down |
Press Up/Down/Left/Right arrows or PgUp/PgDn to scroll through the table |
sysdig/csysdig go well beyond scrolling through a single-table, since you can drill down into the Connections View to see data in other groupings such as per-container or per-thread. |
==
参考链接:
- https://sysdig.com/blog/linux-troubleshooting-cheatsheet/
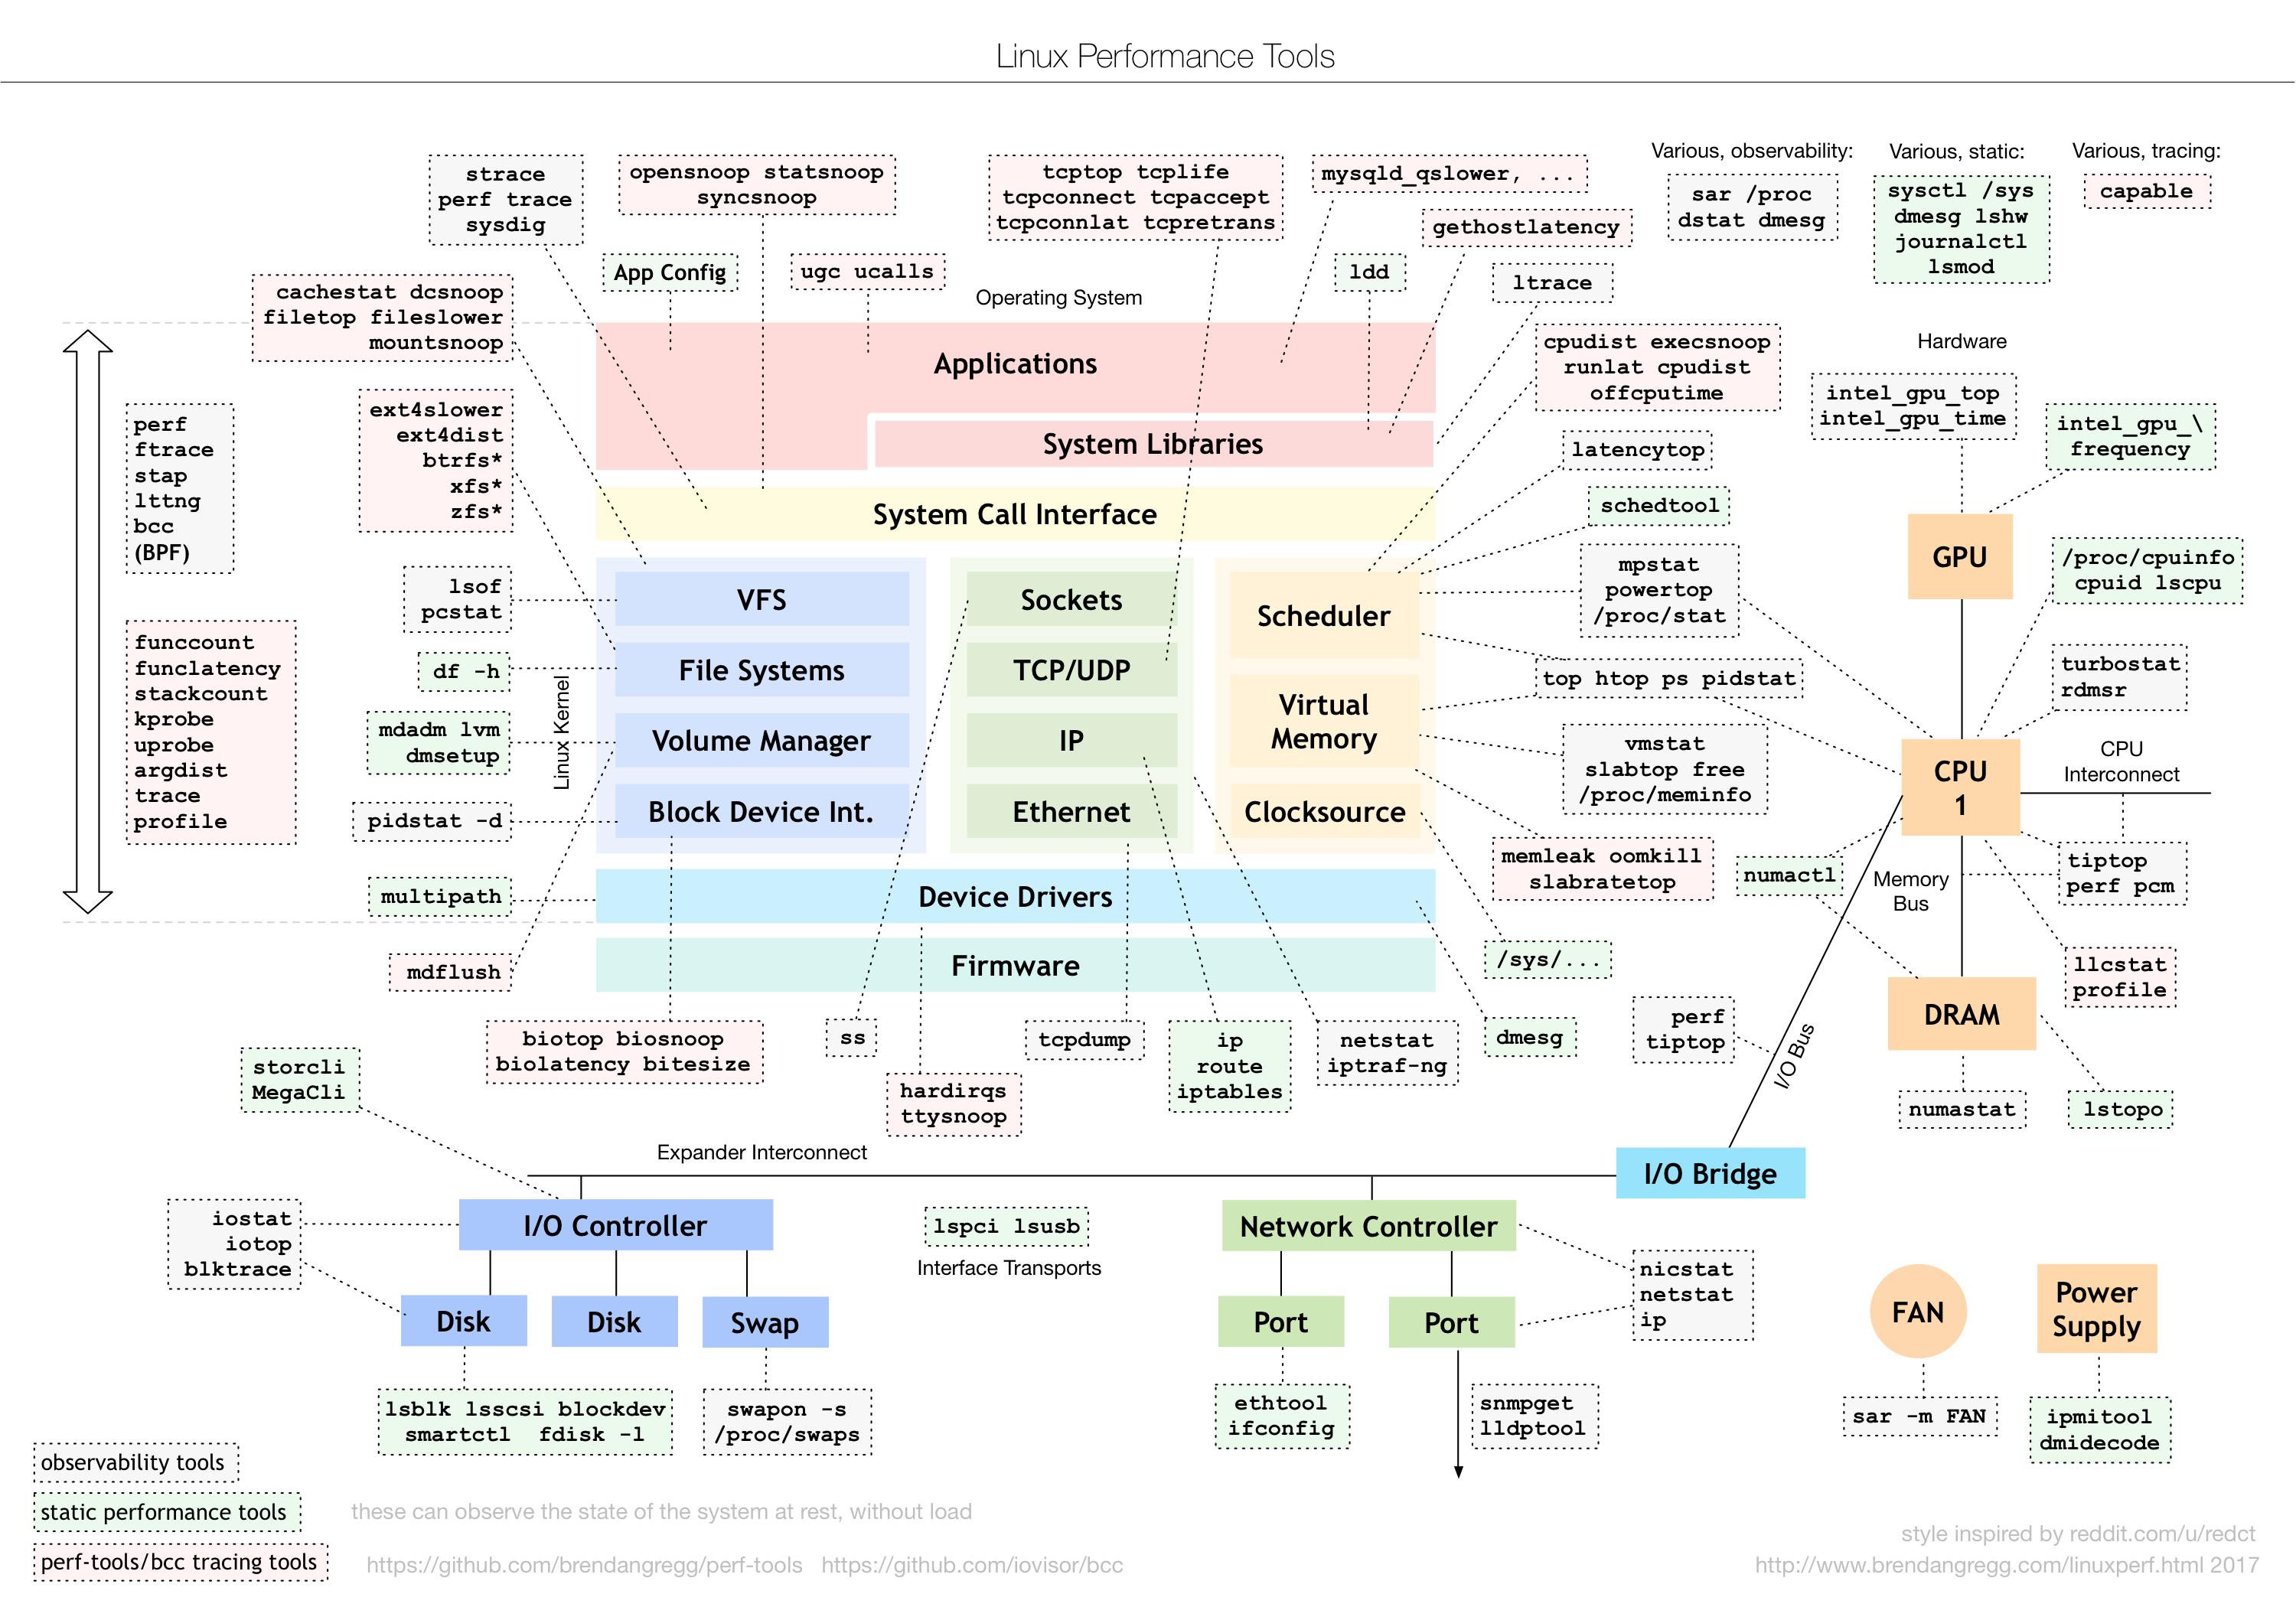
- http://www.brendangregg.com/linuxperf.html
- http://www.brendangregg.com/Perf/linux_perf_tools_full.png
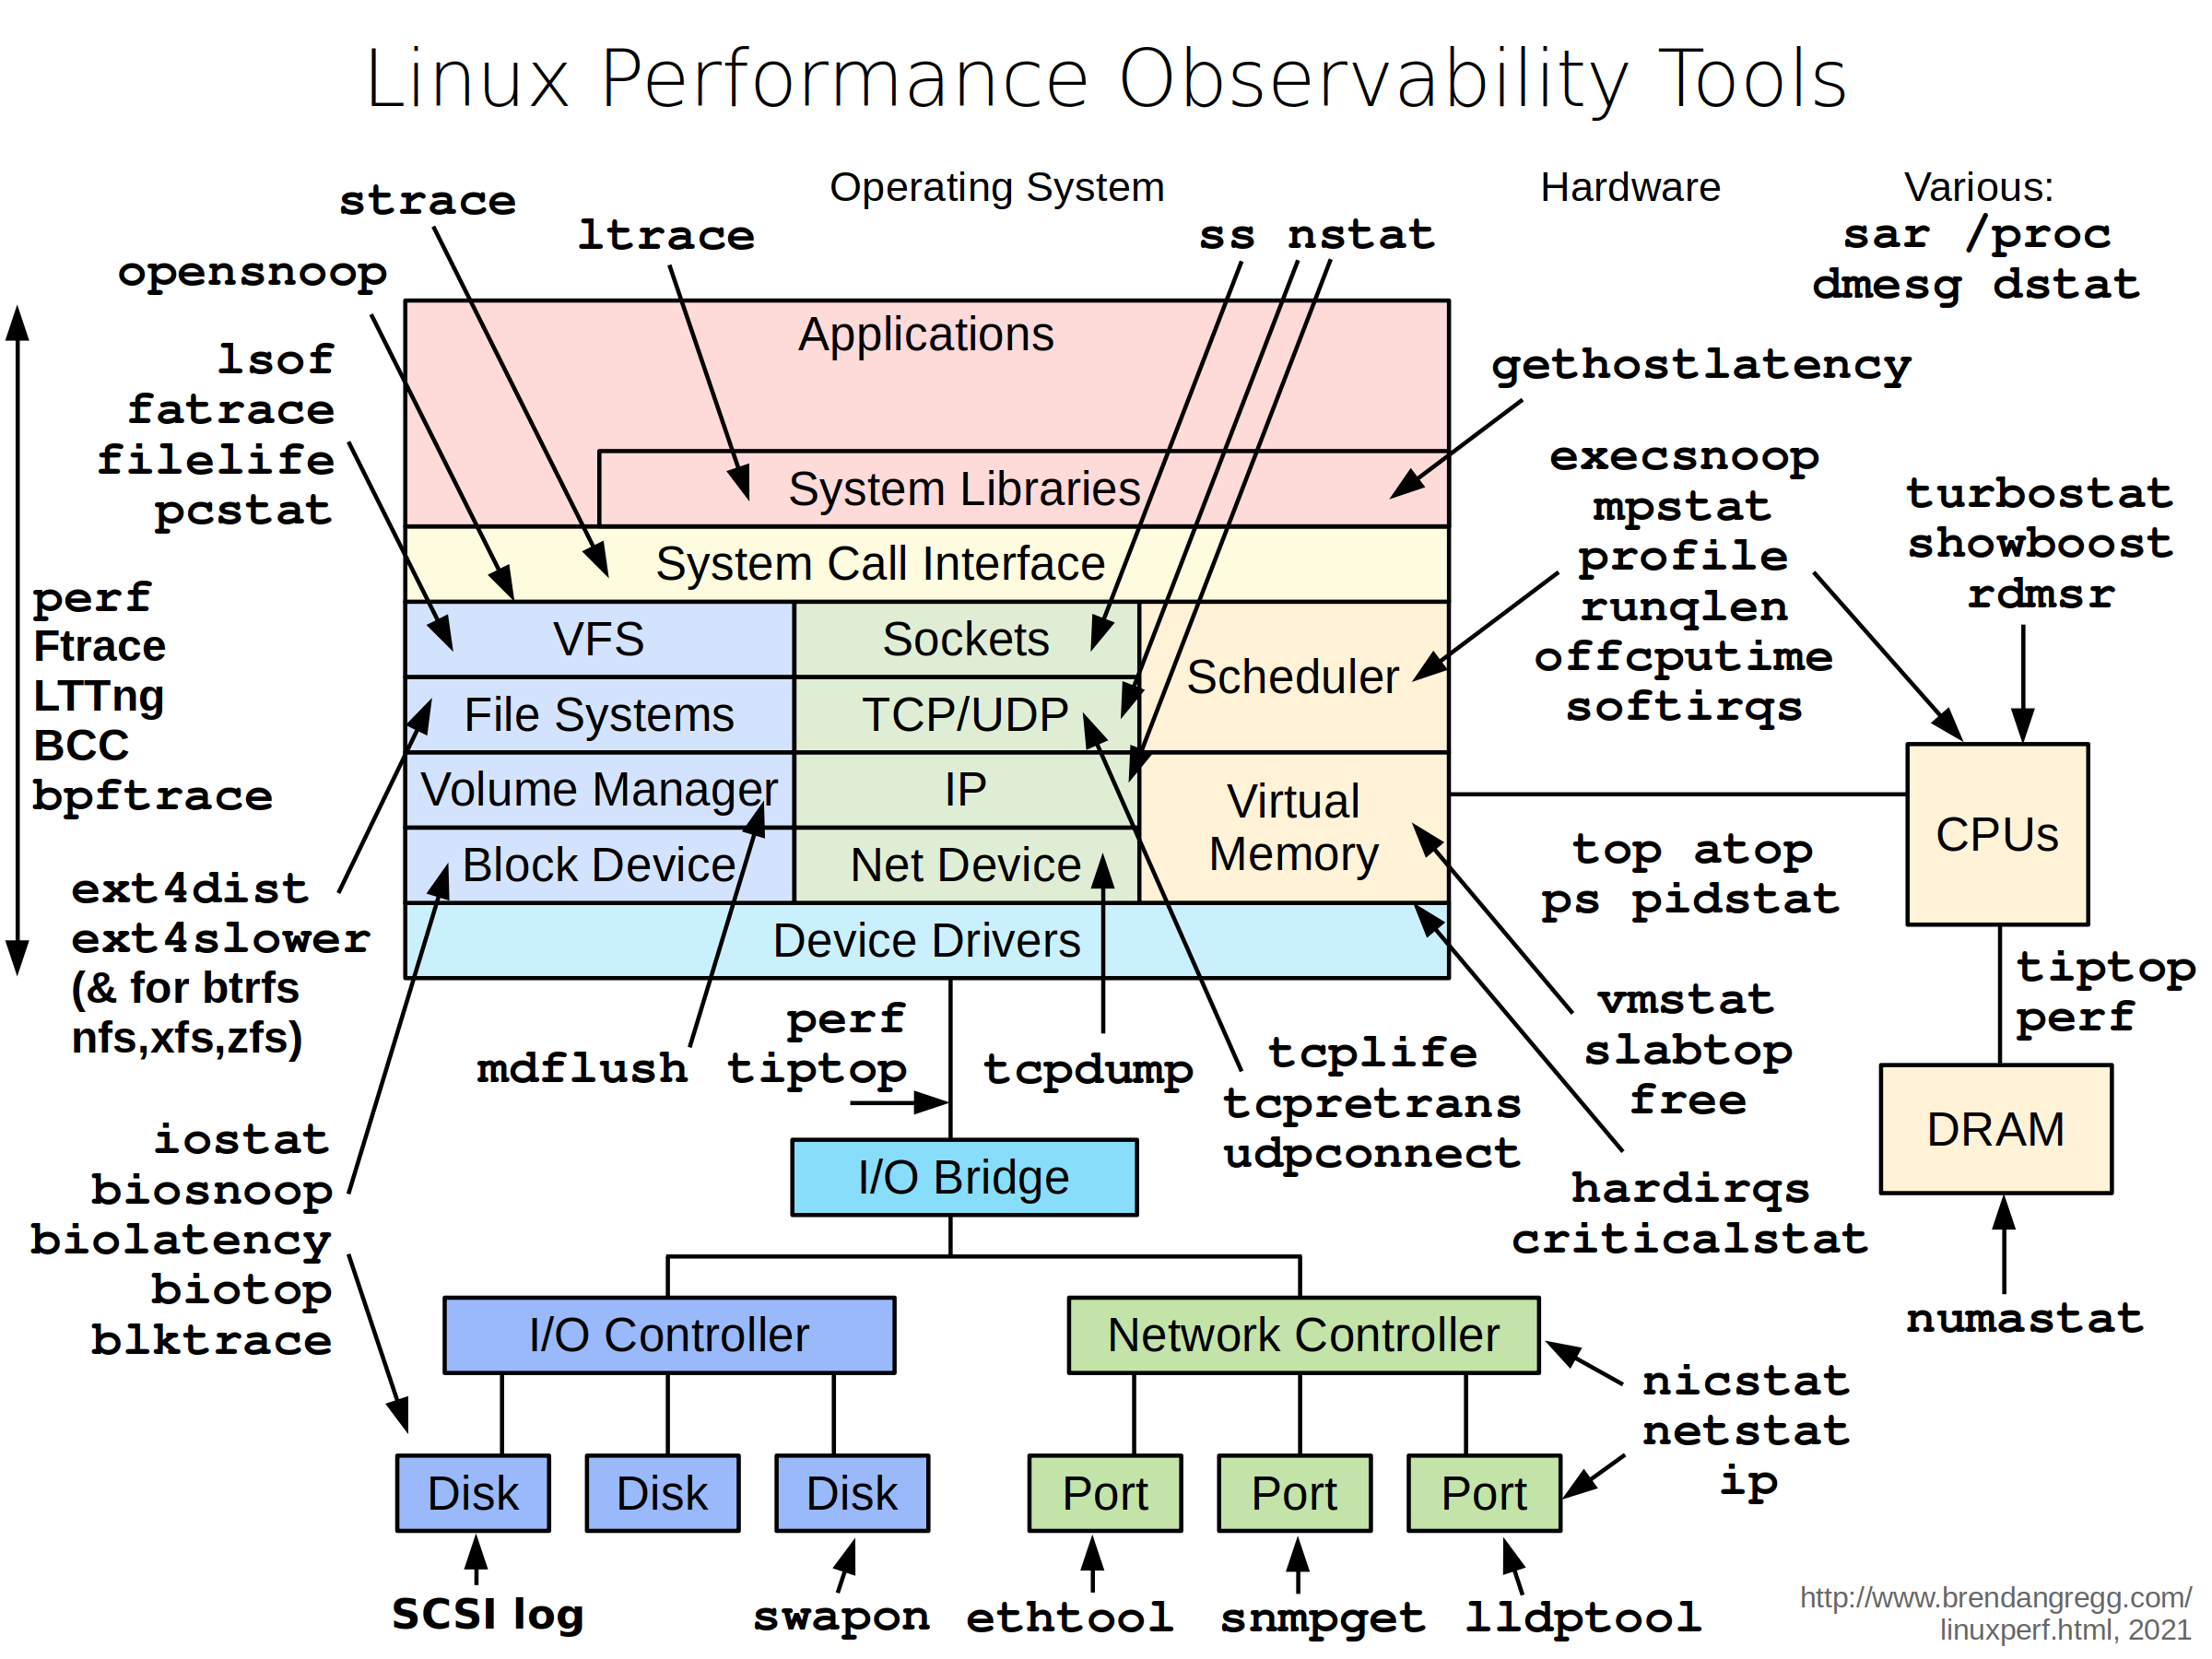
- http://www.brendangregg.com/Perf/linux_observability_tools.png
=END=
《 “Linux故障排除手册:strace/htop/lsof/tcpdump/iftop/sysdig” 》 有 14 条评论
BCC:基于 BPF 的 Linux 分析工具包
https://mp.weixin.qq.com/s/0dadiu7xpAjgTKrF6bwmSQ
7 个使用 bcc/BPF 的性能分析神器
https://mp.weixin.qq.com/s/322QahYGqTwnGObZnzJUYA
https://opensource.com/article/17/11/bccbpf-performance
深入理解 BPF:一个阅读清单 | Linux 中国
https://mp.weixin.qq.com/s/XGtdoOWvEEeFj_PmTplKGQ
https://qmonnet.github.io/whirl-offload/2016/09/01/dive-into-bpf/
Linux 中的 DTrace :BPF 进入 4.9 内核
https://mp.weixin.qq.com/s/zA1SPb9PoIIDukD9RJzgrA
http://www.brendangregg.com/blog/2016-10-27/dtrace-for-linux-2016.html
Tcpdump Examples
https://hackertarget.com/tcpdump-examples/
drltrace – 用于 Windows 和 Linux 应用程序的库调用跟踪器
https://github.com/mxmssh/drltrace
bpftrace 使用教程
https://github.com/iovisor/bpftrace/blob/master/docs/tutorial_one_liners.md
`
Lesson 1. Listing Probes
Lesson 2. Hello World
Lesson 3. File Opens
Lesson 4. Syscall Counts By Process
Lesson 5. Distribution of read() Bytes
Lesson 6. Kernel Dynamic Tracing of read() Bytes
Lesson 7. Timing read()s
Lesson 8. Count Process-Level Events
Lesson 9. Profile On-CPU Kernel Stacks
Lesson 10. Scheduler Tracing
Lesson 11. Block I/O Tracing
Lesson 12. Kernel Struct Tracing
`
高级 TCP 指标
https://satori-monitoring.readthedocs.io/zh/latest/builtin-metrics/tcpext.html
netstat -st输出解析(二)
http://perthcharles.github.io/2015/11/10/wiki-netstat-proc/
TCP SNMP counters netstat -s 各项参数意义
http://www.cnblogs.com/lovemyspring/articles/5087895.html
bpftrace 项目介绍
https://www.slideshare.net/AlastairRobertson9/bpftrace-tracing-summit-2018
如何应对在线故障
http://www.rowkey.me/blog/2018/11/22/online-debug/
TCP 常见故障排查
https://ms2008.github.io/2018/06/01/tcp-troubleshooting/
`
1. 丢包,错包
2. 队列溢出
3. 滑动窗口很小
4. 单个数据包大于 MTU
`
[译] strace 是如何工作的
https://arthurchiao.github.io/blog/how-does-strace-work-zh/
https://blog.packagecloud.io/eng/2016/02/29/how-does-strace-work/
`
本文介绍 strace 内部是如何工作的。我们会研究 strace 工具内部所依赖的 ptrace 系统调用,对其 API 层及内部实现进行分析,以弄清楚 strace 是如何获取被跟踪进程的(系统调用相关的)详细信息的。
1 ptrace 是什么
2 跟踪过程
3 内核实现
3.1 PTRACE_ATTACH 代码流程
3.2 PTRACE_SYSCALL 代码流程
4 进入系统调用
4.1 _TIF_WORK_SYSCALL_ENTRY
4.2 tracesys
4.3 ptrace_report_syscall
4.4 SIGTRAP
4.5 syscall_trace_leave
6 结束语
ptrace 系统调用对调试器、跟踪器和其他的从进程中提取信息的程序非常有用,strace 主要就是基于 ptrace 实现的。
ptrace 内部略微有些复杂,因为执行过程在一些文件之间跳来跳去,但总体来说,实现还是挺简单直接的。
我建议你也看一看你最喜欢的调试器的源码,看它是如何基于 ptrace 来完成检查程序状态、修改寄存器和内存等工作的。
`
[译] ltrace 是如何工作的
https://arthurchiao.github.io/blog/how-does-ltrace-work-zh/
https://blog.packagecloud.io/eng/2016/03/14/how-does-ltrace-work/
`
本文介绍 ltrace 内部是如何工作的,和我们的前一篇文章 strace 是如何工作的 是兄弟篇。
文章首先会对比 ltrace 和 strace 的异同;然后介绍 ltrace 是如何基于 ptrace 系统调用获取被跟踪进程的库函数调用信息的。
1 ltrace 和 strace
2 重要概念
2.1 程序调用函数库的流程
2.2 断点的工作原理
2.3 在程序中插入断点的实现
3 ltrace
4 结束语
ptrace 系统调用非常强大,可以跟踪系统调用、重写运行中程序的内存、读取运行中程 序的寄存器等等。
strace 和 ltrace 都使用 PTRACE_SYSCALL 跟踪系统调用。两者的大致工作过程类 似:为被跟踪程序触发 SIGTRAP 信号,暂停执行,通知跟踪程序(strace 或 ltrace),然后跟踪程序被“唤醒”,分析被暂停的程序。
ltrace 还会通过PTRACE_POKETEXT重写程序内存,以便通过特殊指令中断程序的执行。
想了解更多 PTRACE_SYSCALL 的内部细节,可以阅读我们前一篇介绍 strace 的博客 。
`
探索Sysdig Falco:容器环境下的异常行为检测工具
https://mp.weixin.qq.com/s/BAaOREFajQKk3y4MHDgmuA
【云原生技术研究】BPF能使软件定义内核
https://mp.weixin.qq.com/s/pPDO4NpDoIblh4taJXVuzw
`
BPF通过一种软件定义的方式,将内核的行为和数据暴露给用户空间,开发者可以通过在用户空间编写BPF程序,加载到内核空间执行,进而实现对内核行为的灵活管理和控制
六、总结
BPF机制通过在Linux内核事件的处理流程上,插入用户定义的BPF程序,实现对内核的软件定义,极大的提高了内核行为分析与操作的灵活性、安全性和效率,降低了内核操作的技术门槛。
Linux容器,作为云原生环境重要的支撑技术,是Linux内核上用于隔离和管理计算机进程的一组特性的抽象,高度依赖了Linux内核的底层功能。那么从内核的角度来看:
(1)内核知道所有的进程/线程运行情况;
(2)通过cgroups,内核可以知道Container Runtime配置的CPU/内存/网络等资源的配额以及使用情况;
(3)从namespace的层面,内核可以知道Container Runtime配置的进程隔离情况、网络堆栈的情况、容器用户等众多的信息;
(4)还可以知道容器环境内网络的连接以及网络流量的情况;
(5)容器对系统调用、内核功能使用等信息。
因此,对于云原生环境来讲,如果能够拿到上述内核所拥有的种种信息,对于云原生应用的性能提升、可视化监控以及安全检测有着重要的意义。
`
ebpf 学习梳理和测试使用
https://mp.weixin.qq.com/s/s2iSOF_drW5WKh3HPyIQyw
基于 eBPF 的 Linux 可观测性
https://mp.weixin.qq.com/s/NMJw5gS0OD5HSRRkQ367eA